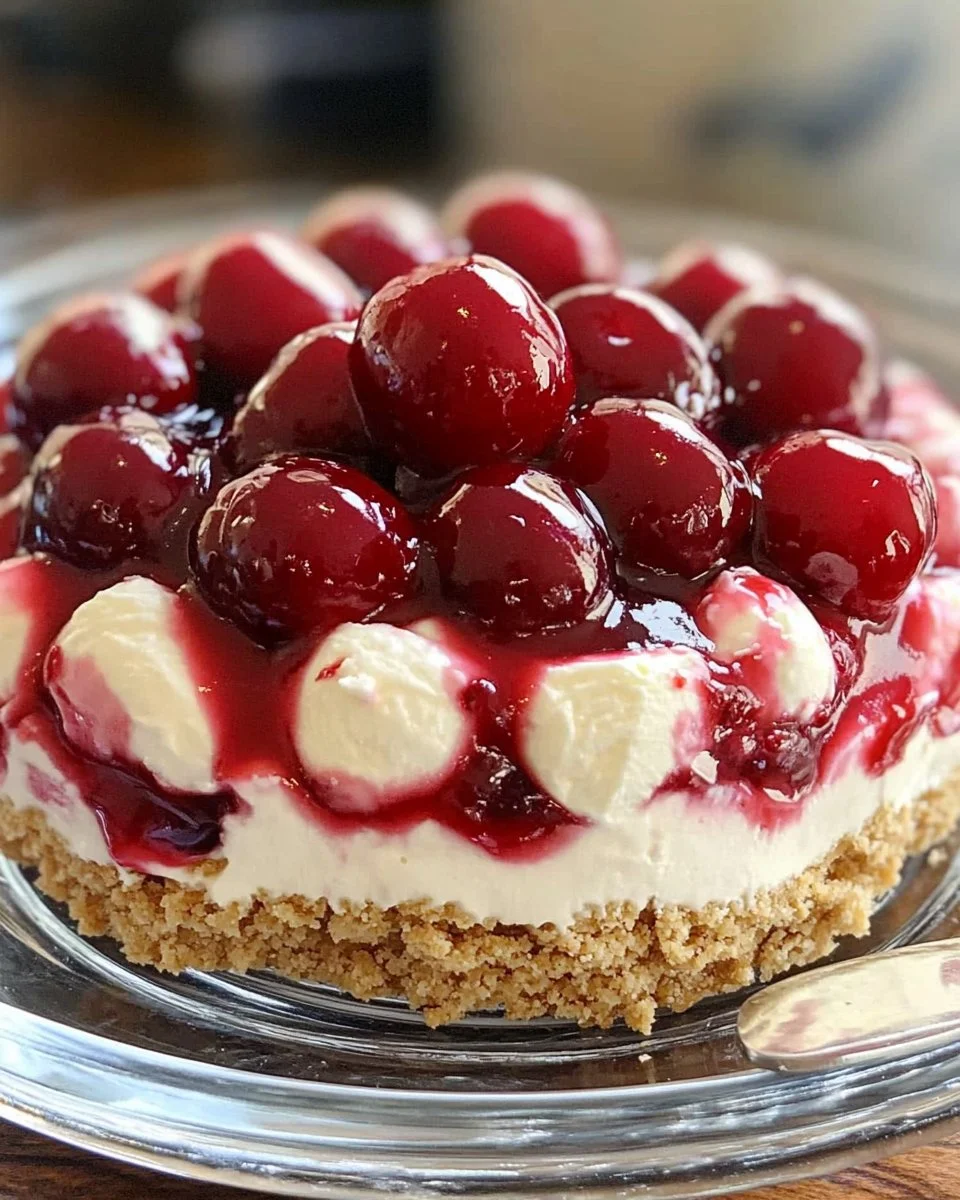
Cherry Cheesecake Lush is a delightful dessert that melts in your mouth with every bite. The creamy layers, the crunchy crust, and the sweet cherry topping create a beautiful harmony of flavors and textures. I remember the first time I had this dessert during a family gathering. Everyone brought their favorite dish, but Cherry Cheesecake Lush stole the show. The combination of flavors was irresistible, and people went back for seconds—myself included!
This recipe is worth trying because it brings a little bit of sweetness to any occasion. Whether you’re celebrating a special event, having friends over, or just want to treat yourself, Cherry Cheesecake Lush fits right in. You don’t need to be a master baker to make it; it’s simple, yet it makes you feel like you’ve put in the effort. Let’s explore why this dessert is so special and how you can make it at home.
Why Make This Recipe
There are so many reasons to fall in love with Cherry Cheesecake Lush! First and foremost, it’s incredibly easy to make. You don’t need to bake anything, which takes away any stress. Just mix, layer, and chill, and you’re all set!
The ingredients are also quite straightforward and usually easy to find at your local grocery store. Cream cheese, whipped topping, cherry pie filling, and graham crackers are staples in many pantries. This makes it a great option for last-minute dessert cravings or when you want to impress someone without breaking a sweat.
Additionally, Cherry Cheesecake Lush is a dessert that everyone can enjoy. It’s creamy and sweet, making it appealing to both kids and adults. The colorful cherry topping makes it look festive, so it’s perfect for birthdays, holidays, or summer barbecues. Plus, everybody loves dessert, right?
Sharing this dessert with friends and family can create joyful memories. It’s more than just food; it’s about togetherness and delighting in the sweeter moments in life.
How to Make Cherry Cheesecake Lush
Making Cherry Cheesecake Lush is as easy as following a few simple steps. First, you’ll create a crunchy graham cracker crust that’s the perfect base for our luscious filling. Picture the buttery aroma filling your kitchen as you mix the melted butter and graham cracker crumbs. Once you press the mixture into your dish, give it a little time in the fridge to set—it’ll hold together beautifully.
Next comes the delightful cream cheese layer. As you beat together the softened cream cheese and powdered sugar, envision a silky filling that you can’t wait to dig into. The whipped topping adds a lightness that makes this layer fluffy and irresistible. Once you’ve spread it over the chilled crust, your kitchen will be filled with sweet, sweet smells!
After the cream cheese layer, you’ll whisk together the vanilla pudding mix with some cold milk. As it thickens, you’ll see the magic happen—thicker pudding means more yumminess! Spread this layer over the cream cheese layer, and then it’s time for the crowning glory: the cherry pie filling.
The vibrant red cherries sitting on top create a visually stunning finish. It’s like a beautiful sunset in a dish. Now all you need to do is chill your creation until it’s ready to serve. The anticipation builds as you wait for that first bite.
Ingredients
-
1 1/2 cups graham cracker crumbs: These crumbs provide a crunchy base that pairs perfectly with the creamy layers. You can use store-bought crumbs or crush your own from whole graham crackers.
-
1/4 cup unsalted butter, melted: Melted butter brings richness to the crust and helps it hold together. If you’re looking for a lighter option, you can use coconut oil.
-
8 oz cream cheese, softened: This ingredient gives the dessert its creamy texture and rich flavor. If you’re vegan, consider using a plant-based cream cheese.
-
1 cup powdered sugar: The powdered sugar sweetens the cream cheese layer and helps create a smooth texture. You can reduce the sugar for a less sweet version or use a sugar substitute if needed.
-
1 (8 oz) tub whipped topping: This adds lightness and fluffiness to the dessert. If you prefer, you can make your own whipped cream by beating heavy cream with a little sugar.
-
1 (5.1 oz) package vanilla instant pudding mix: The pudding gives body and creaminess to the layers. You can substitute it with a different flavor, like chocolate, if you want to mix things up.
-
2 cups cold milk: Cold milk helps the pudding mix thicken nicely. You can use almond milk or soy milk for a dairy-free option.
-
1 can (21 oz) cherry pie filling: This topping adds sweetness and vibrant color. Feel free to swap it with other fruit fillings, like blueberry or strawberry, if you want to experiment!
Directions
-
Prepare the Crust: In a medium bowl, combine the graham cracker crumbs with the melted butter. Stir until everything is mixed well, and the crumbs look like wet sand.
-
Press the Crust: Take a 9×13-inch baking dish and spread the crumb mixture into the bottom. Press it down firmly to form a nice, even crust. Don’t worry too much about it looking perfect; just make sure it holds together! Refrigerate for about 15 minutes so it sets nicely.
-
Mix the Cream Cheese Layer: Get another bowl and beat the softened cream cheese and powdered sugar together with an electric mixer. Keep beating until the mixture is smooth and creamy; it should be fluffy and light. Gently fold in the whipped topping with a spatula until everything is well combined. Be careful not to overmix; you want to keep that fluffiness!
-
Spread the Cream Cheese Mixture: Take your chilled crust out of the fridge and spread the cream cheese mixture evenly over it. Use a spatula to smooth the top, making it look nice and inviting.
-
Prepare the Vanilla Pudding: In a new bowl, whisk the vanilla pudding mix with cold milk. Keep whisking for about 2-3 minutes until the mixture thickens. It will go from a liquid to a luscious, creamy consistency.
-
Layer the Pudding: Spread the pudding mixture over the cream cheese layer. Again, smooth it out so it looks pretty.
-
Top with Cherry Filling: Finally, open the can of cherry pie filling and spoon it over the top of the pudding layer. Spread it gently, allowing the bright red cherries to shine.
-
Chill and Serve: Cover the dish with plastic wrap or a lid and put it in the fridge for at least a couple of hours, or overnight if you can wait. The longer it sits, the better it gets!
How to Serve Cherry Cheesecake Lush
Cherry Cheesecake Lush can be served in a variety of ways! It’s perfect for summer BBQs, birthday parties, or holiday celebrations. The creamy layers and bright cherry topping make it look festive on any table.
Consider serving it with a dollop of whipped cream on top for extra indulgence. A sprinkle of crushed graham crackers as a garnish adds a nice touch too.
Pair this dessert with a refreshing drink, like iced tea or lemonade, to balance the sweetness. It can also be wonderful after a hearty meal, giving everyone a sweet finish they’ll adore. You can even slice it up and serve it as an afternoon treat with a cup of coffee or tea—ideal for gatherings or a cozy afternoon at home!
How to Store Cherry Cheesecake Lush
If you have leftovers (which can be hard to come by!), storing Cherry Cheesecake Lush is simple. Just cover it tightly with plastic wrap or a lid to keep it fresh. It will stay good in the refrigerator for about 3 to 5 days.
If you want to save it for later, you can freeze it. For freezing, it’s a good idea to slice it before wrapping each piece individually in plastic wrap. Place them in a freezer-safe bag or container. This way, you can take out just what you want later! When you’re ready to eat it, let it thaw in the refrigerator overnight for the best texture.
Tips to Make Cherry Cheesecake Lush
-
Use Room Temperature Cream Cheese: This helps the cream cheese blend smoothly with the sugar. If it’s too cold, it will be lumpy.
-
Don’t Overmix: When folding in the whipped topping, be gentle. Overmixing can make the layers heavy instead of light and fluffy.
-
Chill for Best Flavor: Allowing it to chill for several hours lets the flavors meld together beautifully. If you can wait overnight, even better!
-
Be Creative with Toppings: While cherry is the classic choice, don’t hesitate to experiment! Try other fruits or even chocolate sauce for a twist.
-
Keep an Eye on the Pudding: Make sure to whisk it long enough to thicken but not too long that it becomes grainy.
Variation
-
Berry Blast: Swap out the cherry pie filling for mixed berry filling or fresh mixed berries, like blueberries, raspberries, or strawberries. This gives a fresh twist to the dessert.
-
Chocolate Lovers’ Delight: Replace the vanilla pudding with chocolate pudding mix for a rich chocolate flavor. You can even add chocolate chips into the cream cheese mixture for extra indulgence.
-
Dairy-Free Version: Use plant-based cream cheese, whipped topping, and almond milk for a delicious dairy-free dessert that everyone can enjoy.
FAQs
Q: Can I make Cherry Cheesecake Lush ahead of time?
Yes, you can! This dessert actually tastes better after sitting in the refrigerator for a few hours or overnight. It lets all the flavors come together beautifully.
Q: What’s the best way to reheat it?
You don’t actually need to reheat Cherry Cheesecake Lush. It’s best enjoyed cold straight from the fridge. If it’s been frozen, let it thaw in the refrigerator for a few hours before serving.
Q: Can I use a different cheese or flour?
For this recipe, cream cheese is essential for that classic cheesecake flavor. However, if you want a lighter option, you can try using a vegan cream cheese substitute. As for flour, this recipe doesn’t require any baking, so there’s no need for flour in this delicious no-bake dessert!
Cherry Cheesecake Lush is more than just a dessert; it’s a delicious treat that brings people together and adds sweetness to life. With its simple ingredients and easy instructions, it’s a recipe you’ll want to share with family and friends for years to come!
Print
Cherry Cheesecake Lush
- Total Time: 135 minutes
- Yield: 8 servings 1x
- Diet: Vegetarian
Description
A delightful no-bake dessert featuring creamy layers, a crunchy graham cracker crust, and sweet cherry topping.
Ingredients
- 1 1/2 cups graham cracker crumbs
- 1/4 cup unsalted butter, melted
- 8 oz cream cheese, softened
- 1 cup powdered sugar
- 1 (8 oz) tub whipped topping
- 1 (5.1 oz) package vanilla instant pudding mix
- 2 cups cold milk
- 1 can (21 oz) cherry pie filling
Instructions
- In a medium bowl, combine the graham cracker crumbs with the melted butter. Stir until the crumbs look like wet sand.
- Press the crumb mixture into the bottom of a 9×13-inch baking dish and refrigerate for about 15 minutes to set.
- Beat the softened cream cheese and powdered sugar together until smooth. Gently fold in the whipped topping.
- Spread the cream cheese mixture evenly over the chilled crust.
- Whisk the vanilla pudding mix with cold milk for 2-3 minutes until it thickens, then spread it over the cream cheese layer.
- Spoon the cherry pie filling over the pudding layer and spread gently.
- Cover the dish and chill in the refrigerator for at least 2 hours or overnight before serving.
Notes
Allow the dessert to chill for several hours for the best flavor. Experiment with toppings for variation.
- Prep Time: 15 minutes
- Cook Time: 0 minutes
- Category: Dessert
- Method: No-bake
- Cuisine: American
Nutrition
- Serving Size: 1 serving
- Calories: 350
- Sugar: 25g
- Sodium: 200mg
- Fat: 19g
- Saturated Fat: 10g
- Unsaturated Fat: 6g
- Trans Fat: 0g
- Carbohydrates: 40g
- Fiber: 1g
- Protein: 5g
- Cholesterol: 30mg
Keywords: cheesecake, no-bake, dessert, cherry, easy recipes